Your cart is currently empty!
Category: SSL Certificate
Step-by-Step Guide: How to Install SSL on IIS 8 and Later
Part 1: Generate CSR and Private Key
- Access the CSR Generator:
- Go to RunSSL.com’s CSR Generator.
- Complete the Form:
- Fill in the form with accurate information using standard characters.
- Download Your CSR:
- Click the blue button to download your CSR in txt format.
- Save Your CSR:
- Keep the downloaded CSR file in a secure location; you’ll need it during the SSL certificate ordering process.
- Utilize SHA 256 Algorithm:
- Rest assured; our generator employs the secure SHA 256 Algorithm.
- Combined CSR and Private Key:
- Both your CSR and Private Key are conveniently combined in the same file. Use it wisely.
Part 2: Purchase and Install SSL Certificate
- Purchase Your SSL Certificate:
- Choose a suitable SSL certificate, for example, PositiveSSL DV.
- Provide CSR During Order:
- During the ordering process, you’ll be prompted to input your CSR. Use the saved CSR file from Part 1.
- Download Issued SSL Certificate:
- Once issued, download your SSL certificate and save it securely.
Part 3: Install SSL Certificate on IIS
- Access IIS Manager:
- Launch IIS Manager and click the server name in the Connections menu.
- Open Server Certificates Manager:
- On the server’s Home page, double-click Server Certificates in the IIS section.
- Open Complete Certificate Request Wizard:
- On the Actions menu, click “Complete Certificate Request…”
- Specify Certificate Authority Response:
- Click the … button to locate your certificate. Add it to IIS.
- Specify a Friendly Name for easy identification.
- Select Web Hosting as the certificate store and click OK to import.
- Click the … button to locate your certificate. Add it to IIS.
- Set Certificate Bindings:
- Return to the server home page in IIS. In Connections, expand Sites and click the site needing SSL.
- In the Actions menu, click “Bindings…”
- For new installation, click Add. For replacements, click Edit.
- In the Add Site Bindings window:
- Type: https
- IP Address: Select your site’s IP Address or All Unassigned.
- Port: 443
- Host Name: Not required for a single-name certificate.
- If installing on multiple sites, enter the domain for each site.
- SSL Certificate: Select your site’s certificate from the drop-down.
- Click OK when configured.
- Restart IIS:
- For changes to take effect, restart IIS. You can do this in the Actions pane by clicking on “Restart.”
- Test Your SSL Installation:
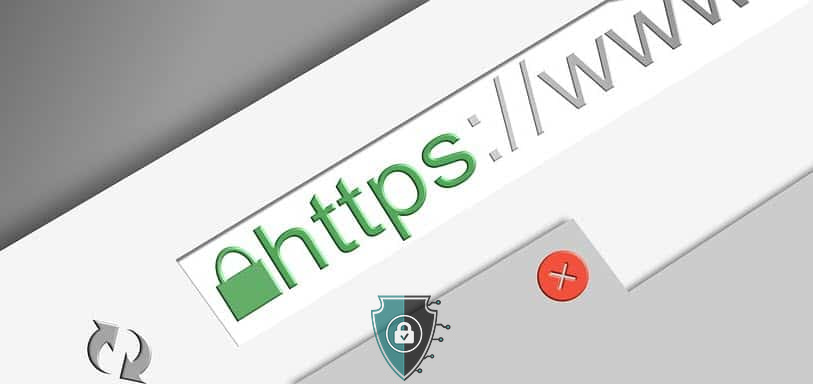
- Open your website using “https://”. A secure padlock icon should indicate successful installation.
Congratulations! Your website is now fortified with SSL. Check for the padlock on your site or use an online SSL Checker tool for verification. Your website is secure, ensuring a safe user experience.
- Access the CSR Generator:
The Importance of Extended Validation SSL for Ecommerce Websites
In today’s digital age, where online transactions have become the norm, ensuring the security and trustworthiness of ecommerce websites is of paramount importance. One crucial aspect of website security is the implementation of SSL (Secure Sockets Layer) certificates. Among the different types of SSL certificates available, extended validation (EV) SSL holds a special significance for ecommerce websites. In this article, we will explore what extended validation SSL is and why it is essential for ecommerce websites.
Extended validation SSL is a type of digital certificate that provides the highest level of authentication and security for websites. It offers a rigorous verification process, where the issuing certificate authority (CA) thoroughly examines the identity of the organization behind the website. This validation process includes verifying the legal existence of the organization, conducting checks on the domain ownership, and confirming the applicant’s authorization to request an EV SSL certificate.
Now, you might wonder why extended validation SSL is specifically crucial for ecommerce websites. Here are five reasons that highlight its importance:
- Trust and Confidence: EV SSL certificates provide the highest level of trust and confidence to visitors. When a user visits an ecommerce website secured with an EV SSL certificate, the browser’s address bar prominently displays the organization’s name, turning it green in most browsers. This visual indicator reassures customers that they are on a legitimate and secure website, significantly boosting their trust and confidence in making online purchases.
- Protection against Phishing Attacks: Phishing attacks are a significant concern for ecommerce websites. Cybercriminals often create fraudulent websites that resemble legitimate ecommerce platforms to deceive unsuspecting users into disclosing their sensitive information. EV SSL certificates help combat phishing attacks by clearly differentiating legitimate websites from fake ones. The stringent validation process involved in obtaining an EV SSL certificate makes it highly unlikely for phishing websites to acquire one.
- Enhanced Conversion Rates: Trust is a crucial factor in driving conversions for ecommerce websites. When visitors trust a website, they are more likely to complete their purchases and share their credit card information. The visual cues provided by EV SSL certificates, such as the green address bar and the organization’s name, significantly enhance customer trust. This increased trust, in turn, leads to higher conversion rates, ultimately benefiting the ecommerce business.
- Protection of Sensitive Data: Ecommerce websites deal with sensitive customer information, including personal details and financial data. Extended validation SSL ensures that this data is transmitted securely between the website and the user’s browser. By encrypting the data and establishing a secure connection, EV SSL certificates safeguard sensitive information from interception by unauthorized individuals.
- Compliance with Industry Standards: Many regulatory bodies and industry standards require ecommerce websites to implement SSL certificates. Extended validation SSL is often a recommended choice for meeting these requirements. By deploying EV SSL, ecommerce businesses demonstrate their commitment to security and compliance, thereby avoiding penalties and maintaining a positive reputation.
In conclusion, extended validation SSL plays a vital role in securing ecommerce websites. It provides a high level of trust and confidence to customers, protects against phishing attacks, boosts conversion rates, safeguards sensitive data, and ensures compliance with industry standards. Implementing an EV SSL certificate should be a priority for any ecommerce business aiming to establish a secure online presence and build customer trust.
A Comprehensive Guide on How to Choose SSL Certificate for Your Website
SSL (Secure Sockets Layer) is an essential component of online security, and it’s crucial to choose the right type of SSL certificate for your website. With so many options available, choosing the right SSL certificate can be overwhelming. In this guide, we’ll cover everything you need to know to choose the best SSL certificate for your website.
Determine your website’s needs:
Before choosing an SSL certificate, it’s essential to determine your website’s needs. If you only need to secure a single domain, a Domain Validated (DV) certificate will suffice. If you need to secure multiple subdomains, consider a Wildcard SSL certificate. If you want to show visitors that your website is trustworthy and authenticated, consider an Extended Validation (EV) SSL certificate.
Consider the level of encryption:
The level of encryption is a critical factor in SSL certificate selection. The higher the level of encryption, the more secure your website will be. SSL certificates use various encryption algorithms, such as SHA-2, RSA, and ECC. Consider the level of encryption and the type of algorithm used when choosing an SSL certificate.
Check the validation process:
The validation process is the process by which SSL certificate providers verify the identity of the website owner. DV certificates require the least amount of validation, while EV certificates require the most. Consider the level of validation required for your website before choosing an SSL certificate.
Check the warranty and support:
An SSL certificate warranty protects you in case of a data breach or other security issues caused by SSL certificate failure. Check the warranty offered by the SSL provider and ensure it covers the potential risks. Additionally, ensure that the SSL provider offers adequate support and assistance in case of any issues with the certificate.
Check the price:
SSL certificate prices vary widely, depending on the type of certificate and the provider. It’s essential to consider the price, but don’t base your decision solely on price. Instead, consider the value offered by the SSL certificate, the level of encryption, validation process, and support provided.
In conclusion, choosing the right SSL certificate is crucial for your website’s security and credibility. Consider your website’s needs, the level of encryption, validation process, warranty, support, and price when choosing an SSL certificate. By following this guide, you can make an informed decision and select the best SSL certificate for your website’s needs
Self-Signed SSL Installation Made Simple
Here’s a step-by-step guide to generate a self-signed SSL certificate using OpenSSL:
Install OpenSSL on your system if it’s not already installed. You can download OpenSSL from their official website.
Open a terminal or command prompt and navigate to the directory where you want to generate the SSL certificate.
Run the following command to generate a private key:
openssl genrsa -out key.pem 2048
This will generate a private key with a 2048-bit key length and save it to a file named “key.pem”.
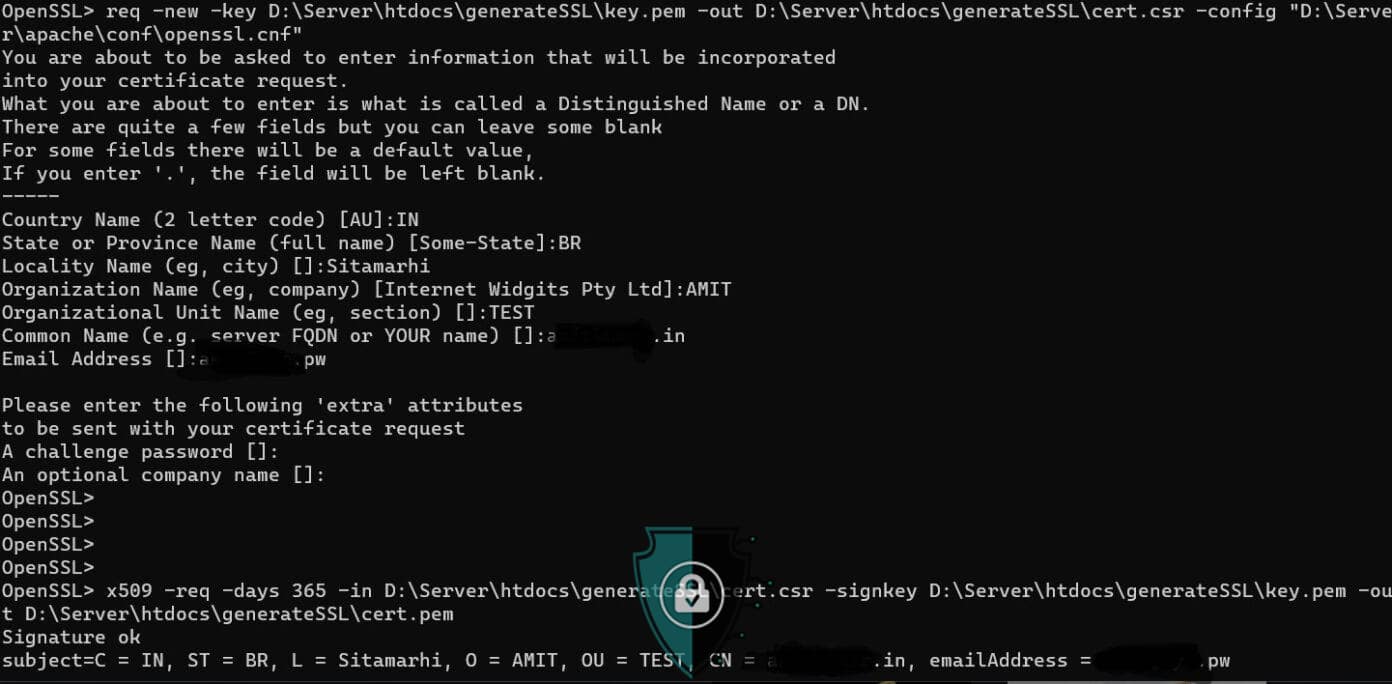
Run the following command to generate a certificate signing request (CSR):
openssl req -new -key key.pem -out cert.csr
This will generate a CSR using the private key you just created and save it to a file named “cert.csr”. You will be prompted to provide some information about your organization and the domain name you want to secure.
Now run the following command to generate a self-signed SSL certificate:
openssl x509 -req -days 365 -in cert.csr -signkey key.pem -out cert.pem
This will generate a self-signed SSL certificate with a validity of 365 days and save it to a file named “cert.pem”.
That’s it! You have now generated a self-signed SSL certificate using OpenSSL. Note that this certificate is not trusted by any browser or operating system, so it should only be used for testing purposes or on a private network. If you need a trusted SSL certificate for a production website, you should purchase one from a reputable certificate authority.
During the SSL generation you might face this issue
req -new -key C:\xampp\htdocs\generateSSL\key.pem -out C:\xampp\htdocs\generateSSL\cert.csr -config "C:\xampp\apache\conf\openssl.cnf" problem creating object tsa_policy1=1.2.3.4.2 25396:error:08064066:object identifier routines:OBJ_create:oid exists:crypto\objects\obj_dat.c:698: error in req
The error message suggests that the OID already exists in the OpenSSL object data file. This could happen if you have multiple OpenSSL installations on your system, or if there are other configuration files on your system that are using the same OID.
To fix this error, you can try assigning a different OID to the TSA policy object, as we did before. However, this time, you should choose an OID that is not already defined in the OpenSSL object data file.
Here’s how you can do this:
- Open your OpenSSL configuration file in a text editor. In your case, the file is located at “C:\xampp\apache\conf\openssl.cnf”.
- Search for the section of the file that defines the TSA policy object. It should look something like this:
[tsa]
default_tsa = tsa_config1
[tsa_config1]
...
tsa_policy1 = 1.2.3.4.1
...
3. Change the value of “tsa_policy1” to a different OID that is not already defined in the OpenSSL object data file. You can use any valid OID that starts with a number greater than 1. For example, you could change it to “1.2.3.4.999”.
[tsa]
default_tsa = tsa_config1
[tsa_config1]
...
tsa_policy1 = 1.2.3.4.999
...
4. Save the changes to your configuration file and try running the OpenSSL command again.
This should resolve the error you’re seeing
How to Install SSL on XAMPP Server
To install SSL on a XAMPP server using OpenSSL, you can follow the steps below:
Step 1: Install OpenSSL
The first step is to download and install OpenSSL on your system. You can download the latest version of OpenSSL from the official website and install it by following the instructions.
Step 2: Generate a Certificate Signing Request (CSR)
Next, you need to generate a CSR for your domain. You can do this by using OpenSSL. Open the OpenSSL command prompt and run the following command:
openssl req -new -newkey rsa:2048 -nodes -keyout yourdomain.key -out yourdomain.csr
Replace “yourdomain” with your actual domain name.Step 3: Purchase or Obtain SSL Certificate
Once you have generated the CSR, you can purchase an SSL certificate from a trusted certificate authority or obtain a free SSL certificate from Let’s Encrypt.
Step 4: Configure Apache to Use SSL
In order to configure Apache to use SSL, you need to modify the Apache configuration files. There are two configuration files you need to modify:
a. httpd.conf
Open the httpd.conf file located in the C:\xampp\apache\conf directory and enable the SSL extension by removing the “#” from the line:
LoadModule ssl_module modules/mod_ssl.so
b. httpd-ssl.conf
Open the httpd-ssl.conf file located in the C:\xampp\apache\conf\extra directory and update the following lines:
SSLCertificateFile "C:/path/to/yourdomain.crt"
SSLCertificateKeyFile "C:/path/to/yourdomain.key"
Replace the path with the actual path where your SSL certificate and key are located.Step 5: Restart Apache
Finally, restart Apache to apply the changes you made to the configuration files. You can do this by using the XAMPP control panel or by running the following command in the command prompt:
net stop apache
net start apache
Congratulations! You have successfully installed an SSL certificate on your XAMPP server using OpenSSL.SSL Made Simple: A Beginner’s Guide to Protecting Your Website
If you’re new to website security, you may have heard the term SSL thrown around. SSL stands for Secure Sockets Layer, and it’s a security protocol that encrypts the data that’s transmitted between a website and its users. This encryption helps protect your website from hacking attempts and other malicious activities.
Here’s a beginner’s guide to SSL and why it makes your website more secure:
What is SSL?
SSL is a protocol that establishes an encrypted connection between a web server and a browser. When a user visits a website with SSL enabled, their browser and the web server exchange information to establish a secure connection. This secure connection is represented by the padlock icon that appears in the browser’s address bar.
Why is SSL important?
SSL is important because it helps protect your website and your users’ data from unauthorized access. Without SSL, anyone with the technical know-how can intercept the data that’s transmitted between your website and your users. This can include sensitive information like passwords, credit card numbers, and other personal details.
When you use SSL, your website’s data is encrypted, making it nearly impossible for hackers to intercept and steal. This encryption also ensures that the data that’s transmitted between your website and your users remains private and secure.
How does SSL work?
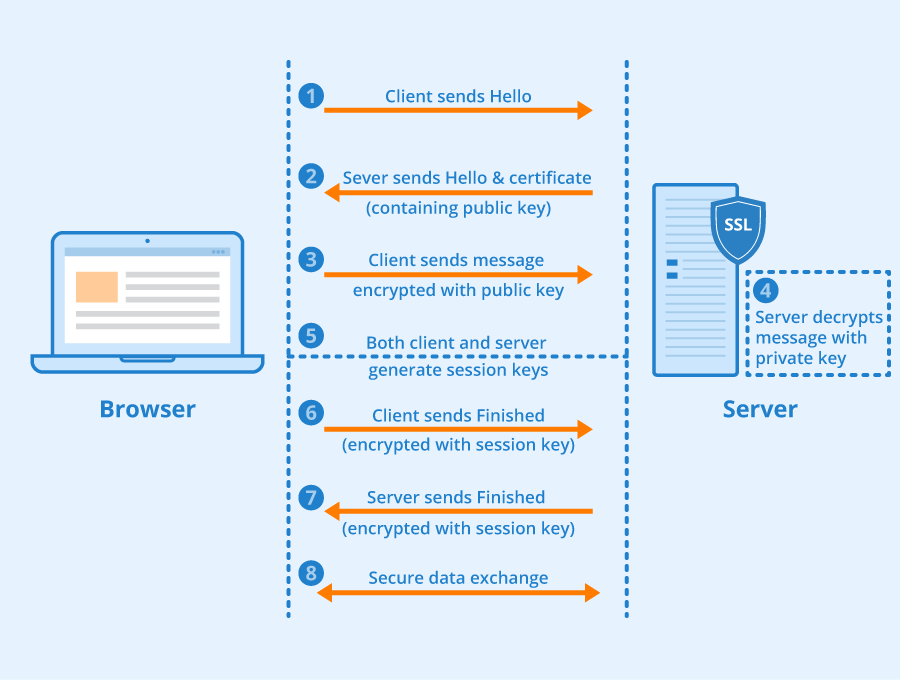
SSL works by using a public key and a private key to encrypt the data that’s transmitted between the web server and the browser. The public key is shared with the browser, while the private key is kept secret by the web server.
When a user visits a website with SSL enabled, their browser requests the web server’s public key. The web server then sends the public key to the browser, which uses it to encrypt the data that’s transmitted to the web server.
The web server then uses its private key to decrypt the data that’s been encrypted by the browser. This process ensures that only the web server can read the data that’s been transmitted.
How can you get SSL for your website?
Getting SSL for your website is easy. You can purchase an SSL certificate from a trusted certificate authority, such as Let’s Encrypt, Comodo, or DigiCert. Once you’ve purchased your SSL certificate, you’ll need to install it on your web server.
Many web hosts such as Hostname.space, icloudjunction.in offer SSL certificates as part of their hosting packages. You are also able to get SSL for your website through GoeSecure.in. Goesecure offer wide range of SSL certificates along with other security services such as backup or anti-malware services.
Secure Your Website with Affordable SSL Certificates from GoeSecure.in (now runssl.com)
Are you looking for a reliable and affordable SSL certificate provider in India? Look no further than GoSecure.in! We offer Comodo Positive SSL certificates that are not only affordable, but also highly secure and trusted by leading browsers.
Why Choose GoSecure.in for SSL Certificates?
At GoSecure.in, we understand the importance of securing your website with SSL certificates. That’s why we offer Comodo Positive SSL certificates at unbeatable prices, so you can protect your website without breaking the bank. Our SSL certificates come with the following benefits:- High-Level Security: Our Comodo Positive SSL certificates are highly secure and provide encryption up to 256-bit, ensuring that your website and customer data is safe from hackers.
- Trusted by Leading Browsers: Our SSL certificates are trusted by all leading browsers, including Google Chrome, Firefox, Safari, and more.
- Easy Installation: We offer easy-to-follow installation instructions, so you can install your SSL certificate quickly and easily, without any technical expertise.
- Dedicated Support: We have a team of dedicated support experts who are available round the clock to assist you with any queries or issues you may face.
How to Buy SSL Certificates from GoSecure.in (now runssl.com)?
Buying an SSL certificate from GoSecure.in is easy and hassle-free. Simply follow these steps:- Visit our website at https://www.goesecure.in/ssl
- Choose the Comodo Positive SSL certificate that best suits your needs.
- Click on the “Buy Now” button and fill in your details.
- Make the payment and complete the order.
- Follow our easy installation instructions to install your SSL certificate.
Conclusion:
At GoSecure.in, we are committed to providing our customers with affordable and highly secure SSL certificates, so they can protect their websites and customer data from online threats. Trust us to be your SSL certificate provider and secure your website today! Visit our website at https://www.goesecure.in/ssl to buy SSL certificates now.The Impact of SSL on SEO
SSL (Secure Sockets Layer) certificates are critical for website security and have become a significant ranking factor in Google’s search algorithm. Websites with SSL certificates are more secure and provide better user experience. Google has been pushing for HTTPS encryption for years, and they’ve made it a ranking factor since 2014. In this blog post, we’ll explore the impact of SSL on SEO and how it affects website ranking.
SSL certificates provide encryption for data transmitted between the website and the user. This encryption makes it difficult for hackers to steal information and improves website security. SSL also increases user trust and confidence in a website. Google favors websites that prioritize user experience and security, and SSL is an excellent way to improve both.
Moreover, SSL is a ranking signal that affects search engine optimization. Google has publicly stated that SSL is a ranking factor, and websites that use HTTPS encryption are likely to rank higher than those that don’t. Google wants to ensure that users have a safe browsing experience and is rewarding websites that prioritize security.
Lastly, SSL can impact on SEO by providing a better user experience. Websites that use SSL certificates load faster, have lower bounce rates, and generate more traffic. These factors are essential for SEO and can improve a website’s ranking in search results.
In conclusion, SSL certificates have a significant impact on SEO. They improve website security, increase user trust, and help websites rank higher in search engine results. Websites that prioritize SSL and provide a secure browsing experience will have an advantage in SEO and user experience.
The Importance of SSL Certificates for Website Security
SSL (Secure Sockets Layer) is a standard security protocol that enables encrypted communication between a web server and a browser. An SSL certificate is a digital certificate that authenticates the identity of a website and encrypts data transmitted to and from it. SSL certificates are essential for online security and should be installed on every website that collects user data or processes sensitive information.
SSL certificates provide several benefits to website owners and users. Firstly, they protect sensitive data from interception by hackers or cybercriminals. This is especially important for websites that handle financial transactions, such as online banking or e-commerce sites. Secondly, SSL certificates increase trust and credibility with users. When visitors see the padlock icon or HTTPS in the browser address bar, they know that their connection is secure and that the website is legitimate.
In addition, SSL certificates can improve search engine rankings. Google and other search engines give preference to websites with SSL certificates, as they consider them more trustworthy and secure. Furthermore, SSL certificates are mandatory for compliance with regulations such as the GDPR (General Data Protection Regulation) and PCI DSS (Payment Card Industry Data Security Standard).
In summary, SSL certificates are essential for website security, trust, and compliance. They provide encrypted communication, protect sensitive data, improve search engine rankings, and help website owners comply with regulations.
Securing Your Code with Code Signing SSL: A Guide to Installation on Linux Apache Server
Code Signing SSL is a digital certificate that is used to sign software code and scripts to ensure their integrity and authenticity. When a code signing certificate is installed, it adds a digital signature to the code, which verifies that it came from the original author and has not been tampered with in any way. This helps to protect users from malware and other malicious software that may be distributed under the guise of legitimate applications.
In this blog post, we will walk you through the installation process of Code Signing SSL on a Linux Apache server.
Step 1: Purchase a Code Signing SSL certificate
The first step is to purchase a Code Signing SSL certificate from a trusted Certificate Authority (CA). There are many CAs available, such as Comodo, DigiCert, and Sectigo. When choosing a CA, make sure to select a reputable one that is recognized by popular web browsers.
Step 2: Generate a Certificate Signing Request (CSR)
Once you have purchased a Code Signing SSL certificate, you will need to generate a Certificate Signing Request (CSR) on your Apache server. You can do this using the following command:
openssl req -new -newkey rsa:2048 -nodes -keyout mykey.key -out mycsr.csr
Make sure to replace mykey.key and mycsr.csr with the file names you want to use.You will then be prompted to enter information about your organization, such as its name and location. Be sure to enter accurate information as it will be used to verify your identity.
Step 3: Submit your CSR to the CA
Once you have generated your CSR, you will need to submit it to the CA to obtain your Code Signing SSL certificate. The process for doing this will vary depending on the CA you have chosen, but typically involves uploading your CSR to their website and completing a verification process.
Step 4: Install your Code Signing SSL certificate
Once you have received your Code Signing SSL certificate from the CA, you can install it on your Apache server. To do this, follow these steps:
Create a directory to store your SSL certificates:
mkdir /etc/ssl/certs
Copy your SSL certificate to the new directory:
cp your_certificate.crt /etc/ssl/certs/
Create a file to store your SSL private key:
sudo nano /etc/ssl/private/your_domain.key
Paste your private key into the file and save it.Configure your Apache virtual host to use SSL:
<VirtualHost *:443>
ServerName yourdomain.com
DocumentRoot /var/www/html
SSLEngine on
SSLCertificateFile /etc/ssl/certs/your_certificate.crt
SSLCertificateKeyFile /etc/ssl/private/your_domain.key
</VirtualHost>
Make sure to replace yourdomain.com with your actual domain name, and /var/www/html with the path to your website’s root directory.Restart Apache to apply the changes:
sudo systemctl restart apache2
Congratulations! You have successfully installed your Code Signing SSL certificate on your Linux Apache server. Your code will now be signed with a digital signature, ensuring its authenticity and integrity.Why is it advantageous to opt for a branded SSL over a Let’s Encrypt SSL?
-
The use of a branded SSL certificate provides several benefits compared to using a Let’s Encrypt SSL certificate. These benefits include:
- Trusted and recognized brand: Branded SSL certificates are issued by trusted certificate authorities such as Comodo, DigiCert, Sectigo, GeoTrust, Thawte and RapidSSL. This gives your website a more professional and trustworthy appearance.
- Higher levels of security: Branded SSL certificates offer higher levels of encryption, making them more secure than Let’s Encrypt SSL certificates.
- Better customer support: Branded SSL certificate providers offer better customer support than Let’s Encrypt. In case of any technical issues, you can receive prompt assistance from a dedicated support team.
- Increased website ranking: Search engines like Google may give preference to websites with branded SSL certificates over those with Let’s Encrypt SSL certificates.
- Improved customer confidence: Branded SSL certificates can increase customer confidence and trust in your website, leading to higher conversion rates and better business results.
In summary, a branded SSL certificate provides a higher level of security, better customer support, improved website ranking, and increased customer confidence compared to a Let’s Encrypt SSL certificate.
-